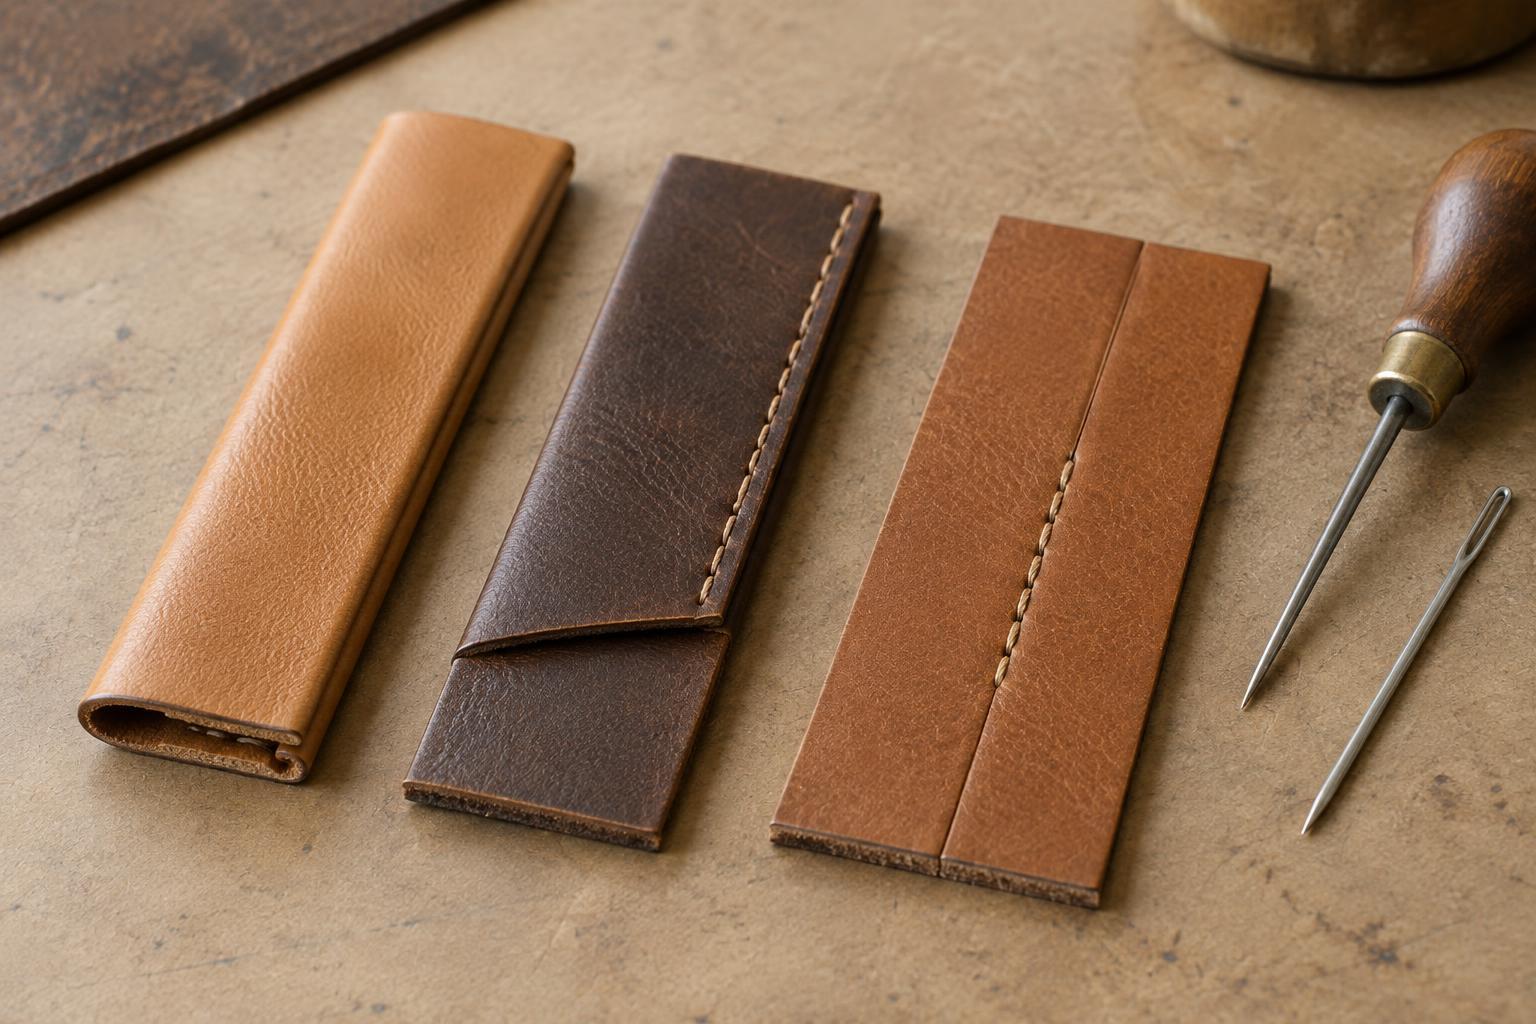
Start with what the seam needs to do
On a wallet, pouch or small case, a seam may need to close a pocket, shape a corner or join two panels without making the object bulky. The maker’s choice depends on the leather’s thickness and flexibility, the shape of the object and where it will be handled. There is no single seam that is best for every accessory.
Look at a seam from three directions: its outside face, its edge and, where accessible, its inside face. Is one piece lying over another? Do the cut edges meet? Has an edge been turned under? These clues help identify the construction, although lining, paint or binding can conceal parts of it. A neat appearance alone does not reveal how a hidden seam is supported.
Folded edges: a covered cut edge
A folded edge is made by turning a leather margin back on itself before securing it. The visible edge is the rounded fold rather than the raw cut. It can give the rim of a wallet opening or flap a smooth, finished look and keep the cut edge away from frequent contact with fingers and contents. A folded edge may be stitched to another panel, but it can also be an edge finish rather than a seam joining two separate pieces.
Folding adds layers. To keep an edge from becoming stiff or thick, a maker may thin the margin before turning it, a process called skiving. At corners and curves, the fold must be managed so excess material does not bunch up. When examining an object, look for a consistent turn, a comfortable transition at corners and stitching that holds the fold in place without cutting into it. Small variations are not necessarily faults, but a fold that lifts or forms a hard lump may affect use.
Overlapped edges: one panel over another
In an overlapped seam, one piece extends over the edge of another and the layers are secured together, often with stitching. It is easy to recognise when the upper panel’s edge remains visible on the outside. The overlap gives the join an area of contact rather than relying on two cut edges meeting precisely. It is useful where the extra thickness suits the design and the joined panels need to stay aligned.
The step between layers can be subtle or pronounced. Skiving the overlapping margin may reduce bulk, particularly where several seams converge. An exposed upper edge might be burnished, coated or otherwise finished, depending on the leather and intended appearance. Check that the overlap lies flat and that stitching runs through sound material rather than crowding an edge. A raised lip is not automatically poor workmanship; consider whether it catches during normal handling or prevents the object from sitting as intended.
Butt joins: edges meeting without an overlap
A butt join places two cut edges beside each other rather than stacking them. From the outside, it can create a nearly level transition between panels, which may be useful for a broad decorative surface or a compact construction. Because the meeting edges alone offer little area to hold a conventional seam, a butt join commonly needs support, such as a backing strip or a panel behind it, with stitching or another securing method connecting the pieces to that support.
The support is not always visible on a lined accessory, so avoid judging a butt join solely by its front face. Look for a steady gap, edges that remain level and no separation when the object is gently handled in its normal direction of use. Do not pull panels apart to test them. A butt join may be harder to repair invisibly if its backing or edges fail, while an accessible stitched overlap may be more straightforward to restitch. The actual repair depends on how the object was assembled.
Reading wear and caring for the seam
Each construction has places worth watching. A folded edge may show lifting at the turn; an overlap may show abrasion along its exposed lip; a butt join may show a widening gap. Stitching can loosen on any of them. Notice changes over time rather than treating every visible edge, crease or slight irregularity as damage.
For routine care, remove loose dust with a soft, dry cloth and avoid soaking seams, especially when their hidden layers or adhesives are unknown. Do not tug at a loose thread or press down a lifting edge with household glue: that can make a later repair more difficult. If a seam is opening or catching in use, set the object aside and ask a leather repairer what can be secured without changing its shape. Understanding the join helps you describe the problem clearly and choose care that respects the construction.


