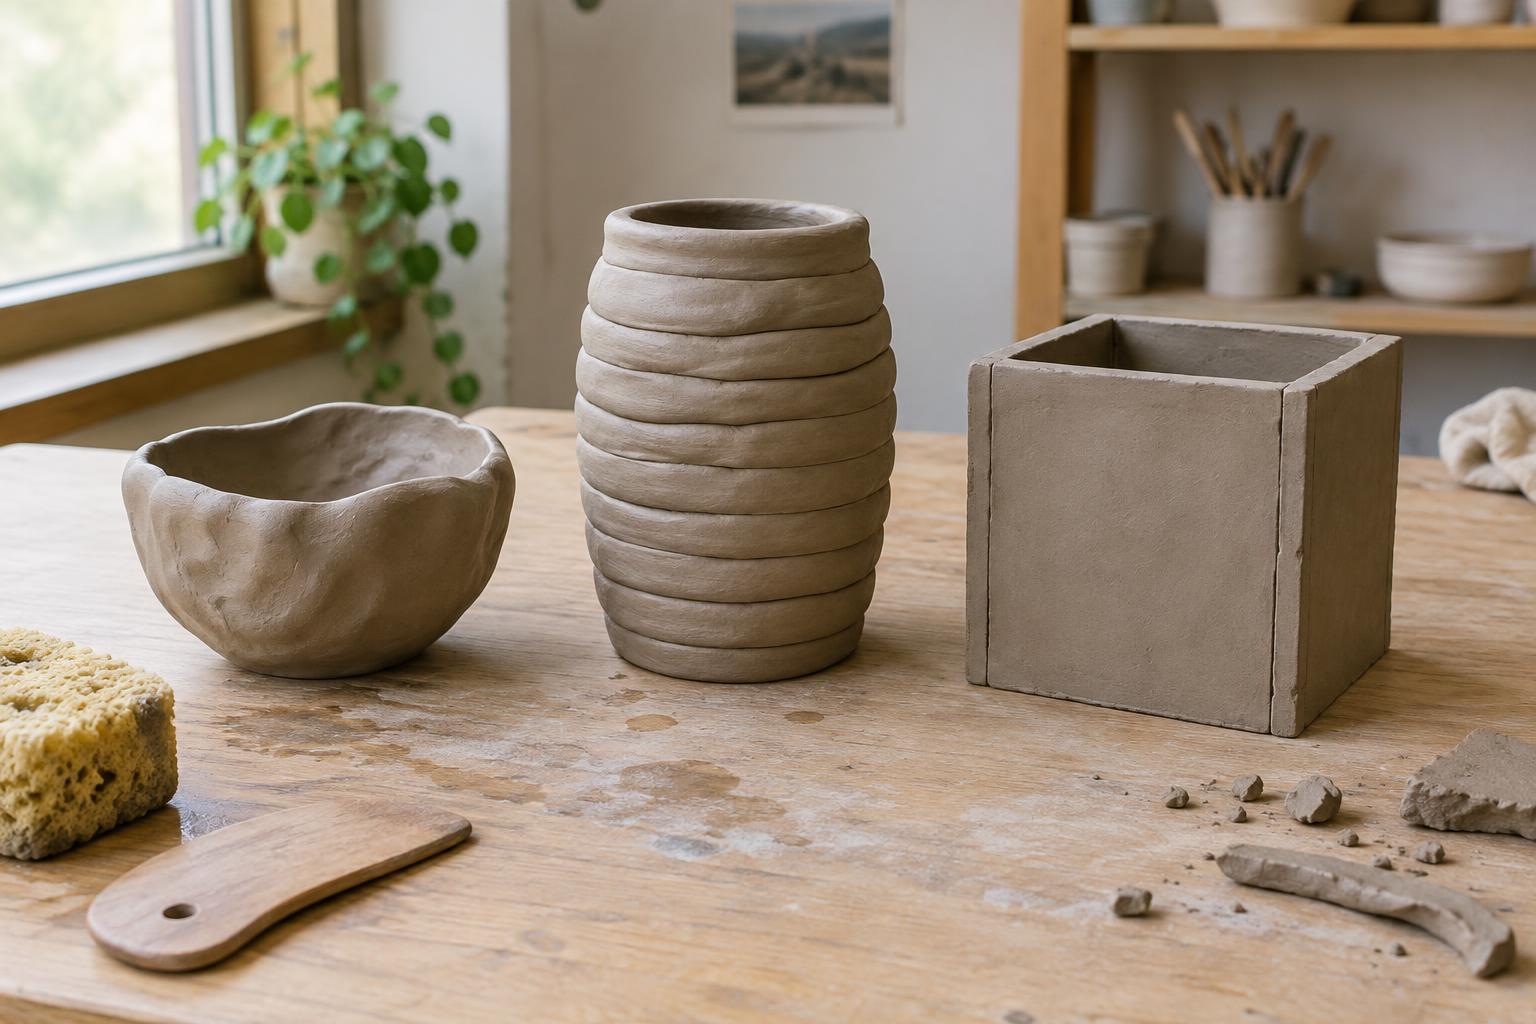
What handbuilding makes possible
A ceramic object does not have to begin on a wheel. Handbuilding shapes clay directly, whether by pressing a hollow into a lump, stacking lengths of clay or joining rolled sheets. These approaches can produce vessels, tiles, small sculptures and decorative pieces. They also invite different decisions: a pinched form grows from the centre outward, a coiled form rises in courses, and a slab-built form begins with planes that are cut and assembled.
The method is not always obvious in a finished object. A maker may smooth away joins, refine a rim or combine techniques in one piece. Looking at the walls, edges and transitions can nevertheless reveal how a form was planned. Understanding those choices is useful whether you are trying clay yourself or examining a handmade piece.
Pinch building: shaping from a single mass
To make a pinch pot, start with a ball of clay and press a thumb into it without pushing through the bottom. Turn the clay while gently pinching between thumb and fingers, gradually opening the hollow and raising the walls. Small, repeated movements give more control than trying to pull a thin wall in one pass. Checking the thickness as you work helps prevent a heavy base beneath a fragile rim.
Pinching suits bowls, small cups, beads and sculptural forms. The slight variations left by fingers can become part of the surface, or they can be softened with careful smoothing. A rim can be compressed gently to bring its thickness into line with the rest of the piece. For a larger hollow form, two pinched halves can be joined, provided their edges are prepared and an opening is left where the firing process requires one.
Coil building: adding height a little at a time
Coil building begins with lengths of clay rolled to a reasonably consistent thickness. Set a coil onto a base or an earlier row, then press and blend the contact area so the parts become a secure wall rather than a stack of loose rings. The coils can remain visible as a pattern, be blended on the inside for strength, or be smoothed on both sides for a quieter surface.
This approach is especially flexible for rounded or irregular vessels. Each new course can sit slightly inside or outside the last to narrow or widen the profile. Work gradually: adding too much height while the lower wall is soft may cause it to lean or slump. If the clay becomes firmer as you work, protect unfinished areas from drying too far before joining the next section. Visible coils are a design choice, not proof that a join was left weak.
Slab building: constructing with sheets
A slab is a sheet of clay rolled or pressed to an even thickness. It can be cut into panels for a box, wrapped into a cylinder, draped over a form or used as a surface for impressed texture. Because the starting material is broad and flat, slab building makes straight edges, crisp corners and repeated shapes easier to plan than pinching does. Small decorative tiles and pendants can also begin as slabs.
Joining slabs takes attention. Edges should meet closely, with enough moisture and pressure to bond; many makers roughen the contact surfaces and add a little clay slip before pressing them together. Supporting a corner while the join firms up helps it keep its shape. Slabs that are too soft may sag during assembly, while very dry slabs are more likely to crack when bent. Texture, cutouts and attachments are easiest to plan before the piece becomes too firm to work.
Choosing a method and finishing the piece
Choose the method that helps you control the shape you want. Pinching offers an immediate way to explore a compact, rounded form. Coils allow a vessel to grow in stages and change direction as it rises. Slabs suit planned outlines and broad surfaces. These are starting points rather than rules: a slab-built body might carry a coiled detail, or a pinched bowl might receive a carefully joined foot.
Whichever approach you use, pay attention to thickness, joins and the pace of drying. Uneven sections can dry at different rates, putting stress on a piece before it reaches the kiln. Letting a form dry gradually, with vulnerable edges protected as needed, can reduce that risk. Clay body, thickness and kiln schedule all affect firing, so follow the guidance for your materials and shared studio rather than assuming every piece needs the same treatment.
Surface finish can emphasize construction or conceal it. Finger marks, coil lines and slab seams may give an object a visible record of how it was made; a smoothed or glazed surface may shift attention to silhouette and colour instead. Neither finish is inherently more handmade. The more useful question is whether the construction, surface and intended use work well together.


